Showing posts with label crafts. Show all posts

Tuesday, December 31, 2013

Best of 2013

It’s hard to believe that tonight we will bid farewell to 2013 and usher in a brand new year with the drop of a ball (or peach).  Like last year, I thought it would be fun to look back on YOUR favorites from the year…

December 2012 092

May 2013 287

November 2012 258 copy

January 2013 053 copy

June 2013 386


January 2013 029 copy

July 2013 227 copy

August 2013 386 copy


April 2013 227 copy
 
Dixie Delights Dressing Southern Tots

In addition to the year’s top ten, a few posts of yore have been favorites for a couple of years now…

July 2012 284 copy

September 2011 162c

April 2011 637

March 2012 327 copy

While sites like Pinterest and Bloglovin are climbing in the ranks, I don’t know where I’d be without the support and generosity of fellow bloggers that have been kind enough to feature me, promote me and just be my friend!  Many, many thanks go out to some of my top referrers, including…


It was a great year for giveaways in 2013!!  I love giving them as much as y’all love receiving them!!  Thanks for partnering with me this year…


And last, but certainly not least, thank YOU for coming to my little slice of the world wide web every day.  Your emails and comments brighten my day.  Every day!  Dixie Delights has been quite an adventure and I sincerely look forward to the fantastic things to come in 2014!

Happy New Year’s Eve, y’all!
xoxo

Thursday, December 5, 2013

Christmas Truth or Dare {Giveaway}

THIS GIVEAWAY IS NOW CLOSED - congratulations Anita on the win.  I can’t tell y’all how much I enjoyed reading about all of your Christmas traditions.  I think my very favorite was from all of you that move your Mary and Joseph around the house in the days leading up to Christmas.  So very sweet.


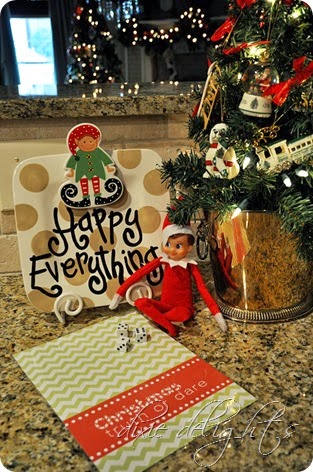
After spending a month playing our Halloween Truth or Dare game, our thrifty and crafty little elf Scout brought this Christmas version straight from the North Pole!  The littles were thrilled to see what he’d cooked up for them and I know it will be our suppertime entertainment for the next few weeks.   Like the Halloween version, the player must roll 3 dice and total them up.  Even numbers get a truth and odd numbers get a dare.  We simply go around the table and take turns choosing for each other.

December 2013 138 copy
 December 2013 139 copy

You can find the instant download in my etsy store for $2.50!!  All ages can play and laughs are pretty much guaranteed.  Our “elf” printed ours on the front and back of a piece of cardstock and then laminated so that it will last us for years to come.  (Yes, I do realize that the baby is always in some state of undress.  A fine example of picking my battles.)
 photo 2 (32)

photo 3 (25)
As a little holiday treat, I’m giving away a printed and laminated copy to one lucky reader.  The giveaway is open to US mailing addresses only.  Post a separate comment for any/all of the following and leave your email address if you don’t have a blog or profile where I can find you.  You will get one chance to win for each thing you do – that’s two chances per person!!

1. Follow my blog and leave a comment letting me know.
2. Leave a comment letting me know about your family’s favorite holiday tradition.

I’ll choose a winner on December 11.

Merry Christmas, y’all!
xoxo

Wednesday, November 27, 2013

Holiday Monograms {Giveaway + Discount}

THIS GIVEAWAY IS NOW CLOSED, BUT THE DIXIEDELIGHTS 10% OFF DISCOUNT CODE IS GOOD THROUGH 12/5.  CONGRATULATIONS CHERISH ON YOUR WIN!!!


I am beyond excited to be bringing MORE monograms to my holiday decor this year!!!  First, take a gander at my new wreaths for my four exterior doors – front, side, friends entry and porch!!

November 2013 478 copy

Here’s how I pulled it off:

1.  You’ll need a 24” basic wreath, 12” indoor/outdoor white monogram from Scrappin Plus, one holiday spray (optional), ribbon and pipe cleaners.

photo 1 (29)

2. Fluff your wreath and cut up the holiday spray with wire clippers.  I find that going with a basic wreath and then adding a few springs of pretty greenery goes A LONG way and is much cheaper than the nicer wreaths that are already made. 
 photo 4 (16)

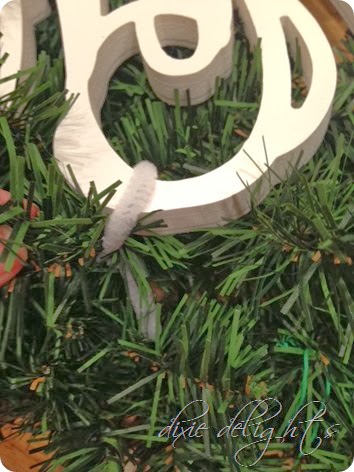
3. Attach the monogram with white pipe cleaners at the four corners.

photo 2 (31)

4. Make your bow and attach with another pipe cleaner.
 photo 3 (23)  
5.  Add the clipped sprigs of greenery!

November 2013 485 copy

In addition to the four wreath monograms, I also added darling 6” wood monograms (also from Scrappin Plus) to our stockings.  I never had them monogrammed with our names and absolutely adore this look.  I painted them with Krylon Short Cuts Gold Leaf spray paint in under five minutes!

November 2013 398 cop2y

If you recall, last year I used a 16” single letter monogram to make the canvas on my porch.  Well, I am thrilled to announce that Tamera has invited me to give away a 16” single letter to one of my readers and a discount code to ALL!!! 

November 2012 258 copy
 
DISCOUNT: Use the Scrappin Plus discount code DIXIEDELIGHTS to take 10% off of your order between now and December 5 (the cutoff for Christmas delivery of unpainted items.)


GIVEAWAY: The giveaway is open to US mailing addresses only.  Post a separate comment for any/all of the following and leave your email address if you don’t have a blog or profile where I can find you.  You will get one chance to win for each thing you do – that’s five chances per person!!

1. Visit the Scrappin Plus etsy store, pin an item you love to your Pinterest board and leave a comment letting me know.
2. Visit Scrappin Plus’s sister store Crafty Little Things, pin an item you love to your Pinterest board and leave a comment letting me know.
3. Like the Crafty Little Things Facebook page, tell them Dixie Delights sent you and leave a comment letting me know.
4. Follow my blog and leave a comment letting me know.
5. Leave a comment letting me know what fabulous thing you’d do with a wood monogram!!

The winner will be announced on December 3!!
xoxo

Friday, November 15, 2013

Chalkboard Clothes Line

Honey’s been busy as a bee building chalkboards, what between the one for the porch and this new edition to John’s room.

November 2013 224 copy

It hangs behind the door next to the desk area.  I mapped out a J using the same process I did for the baby’s W last year.  I also fashioned a little “clothes line” across the top quarter of the chalkboard using a couple of eyelets (is that what they’re called??), twine and paperclips.  John chose a favorite picture and his marathon invite, and I added their birthday party invites (sneek peek!!) and the week’s spelling words.

November 2013 225 copy

And the very first message to grace the board was chalked up there just in time for Reconciliation this week. It was a favorite the minute I saw it.

November 2013 224 copy3

Happy weekend, y’all!  We’re cookin’ up some chili, hot chocolate and s’mores with one of Honey’s high school cronies tonight so it’s high time I got busy myself!
xoxo

Tuesday, November 5, 2013

Tinkering {Before & After}

Last week I unearthed a great coastal bird print that I purchased a while back and never used.  Well, one thing led to another and before I knew it I was tinkering with the bar we have hidden away in our living room armoire.  It’s looked like this for the last four years…
 
October 2011 203
 
Using all things I already had around the house, I test drove the new look with y’all on instagram.  I hung the left over teal grass cloth in the back, pulled the Ballard knockoff sunburst mirror from the guest room, and test drove an Ikea Ribba frame for the bird.

photo1

After living with it for a few days, I pressed forward by gold leafing the ikea frame using Rub ‘n Buff in Gold Leaf.


November 2013 243 copy


And I loved it SO much, that Honey and Daddy-O took the doors off and removed the hardware!!!  It’s crazy what this easy and “free” fix did to brighten up the end of that room!!

November 2013 241 copy

Here’s the before…

July 2013 113 copy

… and the new after!

November 2013 139 copy

Now, who wants to come have a cocktail??
xoxo


Find me at: My Uncommon Slice of Suburbia, Trendy Treehouse, Savvy Southern Style, DIY by Design, Say Not Sweet Anne, Tatertots and Jello, This Gal Cooks, A Stroll Through Life, Memories by the Mile, French Country Cottage, No Minimalist Here, The36th Avenue, It's Overflowing, Shine on Fridays, Funky Polkadot Giraffe, DIY Show Off, House of Hepworth, Made to be a Momma, 52 Mantels, I Heart Nap Time, The Frugal Girls,Six Sisters Stuff, One Project Closer,Jennifer Rizzo, Le Chateau des Fleurs, House on the Way, Common Ground, Hope Studios, Liz Marie Blog, Craft-O-Maniac,  Not Just a Housewife, Some Day Crafts, Miss Mustard Seed, Sugar and Dots, Elizabeth and Co, Rain on a Tin Roof, Coastal Charm, Uncommon Designs, Sew Can Do, Mop It Up Monday,Housewives of Riverton, The Tablescaper, A Lived In Home, SNAP, Alderberry Hill, The Scoop at Cedar Hill Ranch,The Gunny Sack, Remodelaholic,Jembellish, Evolution of Style, Carrie this Home

Sunday, October 27, 2013

Mickey Tie Dye

As promised, I’m finally back with the ins and outs of making your very own Mickey tie dye!  I used the Disney Dreamer Designs tutorial for my shirts and don’t want to steal her thunder so this isn’t a complete tutorial.  Rather, I am just sharing what I did differently to save a little time and correct my errors.

October 2013 086 copy

Supplies: You’ll need all cotton prewashed shirts that were dried without any fabric softeners, tulip dye, waxed dental floss, needle, Mickey outlines, rubber bands, garbage bags, bleach pen, vinegar.

September 2013 219

1. Follow the Disney Dreamer instructions all the way through putting the rubber band on after pulling the dental floss strings.

September 2013 220

September 2013 221

September 2013 222

2. I skipped the soda ash soaking steps because the Tulip dye said this wasn’t necessary.

3. Twist and rubber band your shirts per the Disney Dreamer instructions.
 September 2013 224

4. Dye your shirts using the Disney Dreamer instructions.  Be sure to follow them explicitly.

5. Let the shirts sit over night wrapped tightly in small garbage bags.

6. Unwrap the shirts and pull the rubber bands off. 

7.  At this point I was sad to see that I didn’t have a clear Mickey outline.  I used a bleach pen and drew right on top of the dental floss.  It was pulled out in some places so I just estimated.  I let them sit on the side of my tub for about an hour and then gently pulled the floss totally out.  I carefully put them in the washer so as to not bleach anything unintended. 

8. Wash the shirts on cold with a cup of vinegar in addition to the detergent.  Mother said this helps set the dye.

The baby helped me with the dye part and we really had a lot of fun.  The rest of it was awfully tedious, but worth it in the end!! 

Many thanks to Disney Dreamer for the great tutorial!!
xoxo


24 inch Vine connected wooden monogram letters

Thursday, October 24, 2013

Another Fabulous Monogram Giveaway + Discount Code

THIS GIVEAWAY IS NOW CLOSED.

I’ve been working with Tamera at Scrappin Plus on a few exciting Christmas projects (*squeal*  it’s almost my favorite time of the year!) and she has offered up another FABULOUS give away as well as a discount code available to everyone!!! 

If you’ve spent any time at all around this little blog, it won’t come as news to you that I love my monograms and adore Tamera.  She hooked me up with the three letter wooden monogram that I painted and mounted on canvas for my dressing room!

April 2013 159 copy
 
And then she did the single letter for my glittered burlap project on my porch for the holidays.  (Yall, I cannot wait to pull this back out!)


November 2012 258 copy
 
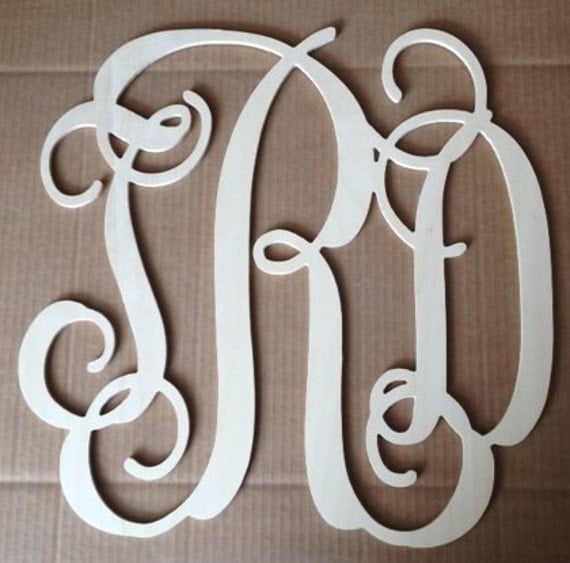
And now, one of you is going to win your very own 24” Vine Connected Wood Three Letter Monogram!!!


24 inch Vine connected wooden monogram letters  
And, as if that’s not enough, y’all are ALL welcome to use the code DIXIEDELIGHTS to take 10% off of her already fantastic prices between now and November 1!
 

Now, for the good stuff…  the giveaway is open to US mailing addresses only.  Post a separate comment for any/all of the following and leave your email address if you don’t have a blog or profile where I can find you.  You will get one chance to win for each thing you do – that’s five chances per person!!

1. Visit the Scrappin Plus etsy store, pin an item you love to your Pinterest board and leave a comment letting me know.
2. Visit Scrappin Plus’s sister store Crafty Little Things, pin an item you love to your Pinterest board and leave a comment letting me know.
3. Like the Crafty Little Things Facebook page, tell them Dixie Delights sent you and leave a comment letting me know.
4. Follow my blog and leave a comment letting me know.
5. Leave a comment letting me know what fabulous thing you’d do with a wood monogram!!

The winner will be announced on Halloween!!
xoxo


PS. Did y'all catch the pics of Prince George's Christening yesterday?  Sweet lil cherub!

John Stillwell/PA Wire


Thursday, October 17, 2013

Pumpkin Projects

Both of the littles carried home pumpkin projects this week.  Tis the season, I suppose!

The baby had to dress up his pumpkin for this month’s family project and it should come as no surprise that he chose Mike Wazowski.  And I must admit, it was a fine choice for a round pumpkin. 
  photo 3 (8)
And the PCP had to complete a Pumpkin Book Report.  He had to answer a few short questions on a character profile page and decorate a pumpkin like said character.  Never in my wildest dreams did I imagine a day when I’d be putting undies on a pumpkin.  John painted on the face with craft paint and we cut up one of Honey’s old t-shirts for the cape.  It’s a pretty good rendition of an albeit questionable literary gem.  But hey, whatever gets him reading.  (And I admittedly have questionable taste in literature myself.)

October 2013 599

October 2013 597

We used a faux pumpkin because I had every intention of absconding with it for my own monogrammed pumpkin project but, much to my dismay, all three boys agreed that this pumpkin must stay as is and come out each and every year for Halloween.  Hmmm…. outvoted again.
xoxo