Showing posts with label Honey Does. Show all posts

Tuesday, December 31, 2013

Best of 2013

It’s hard to believe that tonight we will bid farewell to 2013 and usher in a brand new year with the drop of a ball (or peach).  Like last year, I thought it would be fun to look back on YOUR favorites from the year…

December 2012 092

May 2013 287

November 2012 258 copy

January 2013 053 copy

June 2013 386


January 2013 029 copy

July 2013 227 copy

August 2013 386 copy


April 2013 227 copy
 
Dixie Delights Dressing Southern Tots

In addition to the year’s top ten, a few posts of yore have been favorites for a couple of years now…

July 2012 284 copy

September 2011 162c

April 2011 637

March 2012 327 copy

While sites like Pinterest and Bloglovin are climbing in the ranks, I don’t know where I’d be without the support and generosity of fellow bloggers that have been kind enough to feature me, promote me and just be my friend!  Many, many thanks go out to some of my top referrers, including…


It was a great year for giveaways in 2013!!  I love giving them as much as y’all love receiving them!!  Thanks for partnering with me this year…


And last, but certainly not least, thank YOU for coming to my little slice of the world wide web every day.  Your emails and comments brighten my day.  Every day!  Dixie Delights has been quite an adventure and I sincerely look forward to the fantastic things to come in 2014!

Happy New Year’s Eve, y’all!
xoxo

Friday, June 21, 2013

Honey Does: The Garage {Before & After}

Hello ladies,

What a “delight” to be back on the blog today, as Amanda would say.  It’s been too long.  (I’m kidding.)  When we moved into this house (and the last one come to think of it), Amanda pretty much gave me free will to decorate however I wanted.  As long as it was contained to the garage and the basement storage areas.  After weeding my way through this mess every time the garbage needed to go out or a bike tire needed to be pumped, I drew up some plans to put everything in its place. 

photo 4 (30)

April 2013 022 
I measured the long wall of the garage and then made a list of everything I thought we’d have to store for the long term.  I counted things like baseball bags and tennis racquets and excluded things like the ridiculous inflatable dolphin pool that’s had a leak since the weekend after we got it five years ago.  (I think I was supposed to patch that.)  I decided to use the same Home Depot unfinished prefabricated cabinets that I used in the basement reno.  They are affordable and could be painted in whatever color Amanda’s heart desired since that was where her creative license on this project began and ended.  After figuring out how to align the necessary lockers to the space, I purchased the cabinets and built the base.  From the base, I then built the side walls, as you can start to see in the picture below.  Finally, I put a top on the walls and then mounted the cabinets to the wall in the space above.  I bought a paint sprayer to do the cabinets but after I inadvertently painted the ceiling and walls with it I then had to hire a painter to re-do the entire garage – trim, ceilings, walls and doors.

April 2013 024

Since I’m not a blogger, I didn’t take a whole lot of pictures.  Here is the finished garage locker space – nice and neat.

May 2013 467 copy

Here you can see the space a little better.  Obviously my wife got a hold of more than the paint color, as I’m sure you guessed from the Welcome sign and rug.

August 2013 386 copy

August 2013 391 copy
  

May 2013 477 copy

Amanda got this welcome sign in an antique store on her and her sister’s annual visit to Ron’s place in New Orleans.  (She asked me twenty five times to make sure I noted that.  Says y’all like to know where everything comes from.  “Sources, Honey.  Don’t forget the sources.  People NEED that information.”)

May 2013 476 copy

The wall next to the guest locker has hooks for towels and swim suits and a dirty laundry basket.  This is where our (meaning us boys) dirty wet rolled up socks that are usually deposited all over the garage are now supposed to land.  The crab was an unfinished wood piece cut by Tamera at Scrappin Plus on etsy (Amanda insists it is important that I let you know it’s from the same lady who did our wood monograms here and here.)  Amanda and her Mother painted it the same color as the door.

August 2013 392 copy

August 2013 396 copy

The laundry baskets are from Target.  Amanda added a label out of chalk board paper.  (How am I doing with the sources?)

May 2013 475 copy

We got a new door put on the garage with the other exterior work we’ve been doing.  Bikes, scooters and corn hole boards go in this space.  Do you see where Amanda and her friend Tricia went crazy plastering our initials all over everything in sight?

May 2013 488 copy

From left to right we have lockers for:  golf, camping, fishing, balls, pool/beach and then one for Whit and one for John.  The boy’s lockers hold their baseball bags, tennis rackets, bike helmets, shoes and other gear.

May 2013 471 copy

May 2013 478 copy

May 2013 479 copy

May 2013 480 copy

May 2013 481 copy

Amanda attached vintage locker numbers that she found at Paris Market in Savannah on all the baskets.  I actually think they are pretty cool.  The baskets were ordered from Amazon with the gift card we won last year from One Project Closer.

May 2013 483 copy

May 2013 482 copy 
We already had the rest of the shelving units.  They hold things like coolers, our big tent, the jump castle (which I hope will be dearly departed very soon), lounge chairs and the tailgate canopy.

May 2013 485 copy
The last thing I did was replace the old “atrocious” (to quote Amanda) light fixtures with new drum lights from Ikea.
August 2013 405 copy - Copy

August 2013 404 copy - Copy 

The paint colors are the same from the outside of the house.  They are all by Benjamin Moore.  Doors – Grenada Villa, below chair rail + cabinets – Revere Pewter, above chair rail – Pale Oak, trim – White Dove.

I’m thinking about hanging crown molding in John’s bedroom this week because Amanda and the boys are getting out of my hair down in Savannah.  That’s probably smart since the last time I did it there were a few four letter words flying around.

Have a good day,
“Honey”


Flattered for the features at By Stephanie Lynn, Evolution of Style, From My Front Porch to Yours, My Uncommon Slice of Suburbia and I Heart Nap Time!

Friday, January 18, 2013

Honey Does: DIY Flat Screen TV Cabinet

Y’all, I am positively thrilled to have Honey with us today sharing one of his recent DIY projects.  So, without further ado, I turn over the reins to Honey…

I know that Amanda recently shared the two paintings we had our family friend, Mary Pratt, paint for her Christmas present.  One of the things I love about my wife is that she never leaves me guessing as to what she wants so she’s always thrilled on Christmases, birthdays and all those other holidays Hallmark created.  It’s always a win-win scenario.

January 2013 029 copy

What my lovely wife didn’t share about her Christmas gift was part 2 (The part that comes after writing the check and thinking I’m done.)  She wanted me to build a cabinet around our TV in the bedroom and then hang the 2 paintings on it to close like barn doors.  Being a guy, my first thought was “Why make me have to get up and open the cabinet to watch TV…you’re just making my life more difficult.”  In the end, she begged and pled and pretty much drove me crazy until I agreed to the gift.  In the event that you haven’t already figured this out about Amanda, let me go on and tell you that she always subscribes to the “form over function” school of thought. 

Dixie Delights DIY Flat Screen TV Cabinet

This one was pretty easy to sketch out as it is just a box on the wall that the TV had to fit into.  I decided to not have a top to this box so that the TV could still be taken off the wall and taken out to the porch when a big game is on.  I made my measurements for the 3-sided box and measured how far out the TV stood for my depth and the total dimensions of the paintings.  They were each 20x24 so when put together the total size of the paintings and box were 40"x24".  Note to self for future projects: don’t just measure depth at one point, because if something is tilting out and you measure at the shallowest point, you’re screwed later on.  Which I was.

After gathering my supplies and tools I cut a couple of 2x4s to screw the side edges of this box into.  I attached them to the studs in the wall and I had my framework.  A while back I had already cut a hole in the drywall to weave the cords through so that they would be hidden.  As I’m sure you’ve guessed, that too was an Amanda idea.  The black thing is the best flat screen TV mount I’ve ever had.  (See it here)

photo 1 (30)

Next up, was attaching the side walls to the 2x4s. Really the only challenge was in making sure they were level with each other and hung as straight up and down as possible. If these weren’t nearly perfectly vertical, then the “barn doors” could swing open or closed on their own. How I handle something like this is to attach the wood and then measure with my level. If it is off, then I’ll loosen some screws and insert a wooden shim to make it straight. Screw the screws back in we are all good.

photo 2 (30)

So I now have my side walls, next up was the bottom shelf.  Easy enough, just screw it into the side walls.  No troubles here…especially because it was going to be painted.  Because it was going to be painted, the joint didn’t have to look too nice between the two pieces of wood.  Once all of that was done, I used wood filler to fill in the areas where the screws were countersunk and also any gaps at the corner joints.  Let dry, make a huge mess sanding them down, watch Amanda silently freak out over the mess, and then we are ready to paint.
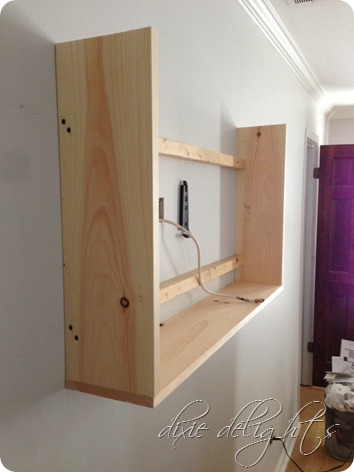
photo 3 (25) 
Painting was also fairly easy because the color was the same as our walls. Taping…not needed. Precision…doesn’t matter. This was going along great.

Once the paint dried it was time to hang the paintings. This required a lot of precision because even though the side walls were perfectly upright, if the hinges were off, the paintings could still open or close on their own. I first attached the hinges to the paintings and then screwed in the top screw of the top hinge only to the box. This allowed me to swing the paintings shut to make sure they would close all the way without having too much of a gap. Once I had them lined up, I just eyeballed where the lower hinge sat on each side and then opened the paintings and screwed in all the hinges.

photo 5 (9)
 
The last step was to make sure the paintings would stay closed.  I first started out trying to use magnets to ensure the paintings stayed closed but that was a disaster so I moved on to door catches.  This was what I should have started with anyways…the magnet incident wasted a lot of time and tested my sanity.  (Door catch on left, magnet that didn’t work on right)

January 2013 358

As far as I was concerned, this project was done.  I cleaned up (which was a pain because of the sanding) and then hung the TV back on the wall.  It fit perfectly in the box.  It was centered horizontally and there was just enough room under the TV to put our cable box in there too.  I sat back for a while and marveled at my DIY craftsmanship…sweet.

January 2013 363 copy

Then I went to close the paintings and disaster struck. It wouldn’t close…the TV tilted down and as I mentioned before, I measured depth from the bottom. So the top part of the TV was sticking out about ½ inch too far…this sucked.

tv
 
Easy solution, I thought…just tilt the TV back some so it fits.  Well with the box around the TV I couldn’t reach in there to change the tilt (and before you say something like “there is no top, just get a stool and reach in from the top”…remember the 2x4…yeah it’s in the way.  There was some other reason why I couldn’t take the TV off, fix the tilt and then re-hang the TV.  Something to do with the bracket I think.

So I had 2 options:
A) Remove one of the side walls, fix tilt, re-install wall
B) Cut top 2x4 somehow to make space to fit my arm back there

Neither option looked appealing.  The first one would make another mess and I would have to redo so much of what I had done.  The second option would be a pain because I didn’t have a reciprocating saw.

While I was procrastinating, the fact that I was only a ½ inch off stuck in my head.  Then it hit me…drywall is usually 5/8 or ¾ of an inch.

So I get the TV back down, then unscrew the bracket from the wall.  Cut out the drywall and then screw the bracket back into the same holes it was at.  Re-hang the TV and the doors finally closed.

January 2013 029 copy

As is almost always the case, one of Amanda’s hair brained ideas turned out to be a pretty great addition to the place.  I have to admit that I really enjoy working along side her to make this house awesome. 

You ladies have a nice day.
“Honey”

Flattered for the features at Savvy Southern Style and No Minimalist Here!
Find me at The CSI Project.